|
>>>
LET'n'C <<< Lunar Eclipse Timer and Camera Controller |
|
Total Lunar Eclipse of August 28, 2015 ©Robert Nufer |
|---|
|
>>>
LET'n'C <<< Lunar Eclipse Timer and Camera Controller |
|
Total Lunar Eclipse of August 28, 2015 ©Robert Nufer |
|---|
|
Automated Lunar Eclipse Photography |
|
If you are a solar eclipse enthusiast, you may know my software SET'n'C, which is available for free from this web site (SET'n'C). With this software (running on Microsoft Windows systems), exposure tables for the automated solar eclipse photography using Canon EOS digital cameras can be created with a few mouse clicks. I have now written a similar program for lunar eclipses: LET'n'C (Lunar Eclipse Timer and Camera Controller). |
|
|
|
Hint to users It was possible, that LET'n'C unintentional brings your camera in a severe status (Error 70). This issue occurred in older versions of SET'n'C, but it is corrected in the mean time. Normal camera operation can then be achieved running Canon's EOS Utility. Before downloading LET'n'C, you should therefore download Canon's EOS Utility. Do not load Canon's EOS utility if running LET'n'C.
Read the contents of this page before you run the program.
Please, play with it and drop me an
email with hints, ideas, wishes ... |
|||||||||||||||||||||||||||||
|
The philosophy behind this kind of lunar eclipse photography
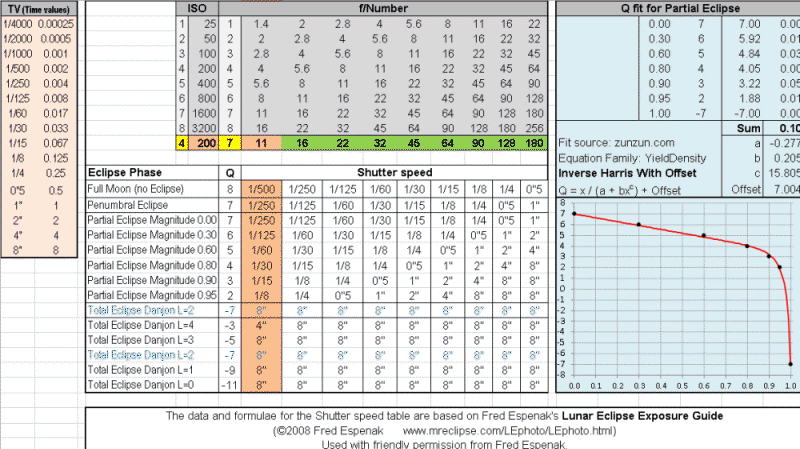
During the progress of a lunar eclipse the surface brightness of the Moon varies (much more than you would expect). Therefore exposure times (and other settings) have to be adjusted over a wide range during the course of the eclipse. In 2008, Fred Espenak published the table Lunar Eclipse Exposure Guide. His table shows proposed exposure times depending on ...
Using the formula t = f2 / (I x 2Q) , the shutter speed (exposure time) t in seconds is computed.
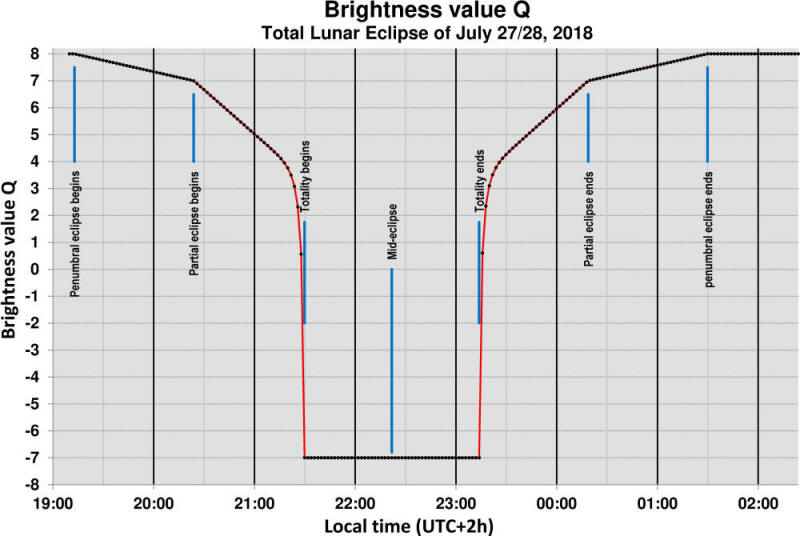
The formula for Q and an the table layout are used with friendly permission from Fred Espenak. Explanation and reading example: For Full Moon, brightness value Q is 8. Setting ISO to 200 and aperture to f/11, exposure time 1/500 is proposed. Then, the Moon enters the Earth's penumbral shadow and reaches the umbral shadow. At this moment partial eclipse magnitude is 0.00, but brightness value Q has lowered to 7. Proposed exposure time is 1/250. As the partial eclipse magnitude increases, the brightness value Q decreases. Once totality is reached, brightness value Q is set (assumed) to -7, and an exposure time of 8" has to be set. During the very early and late (penumbral) phases, brightness value Q is interpolated linearly between Q=8 and Q=7. During the partial eclipse phases, brightness value Q is computed using the formula shown in the blue region of the above image, yielding the red curve. During the totality, brightness value Q is set constant to -7. (Assuming a Danjon value L=2) The computed brightness values Q during the Total Lunar Eclipse of July 27/28, 2018 are show in the following image:
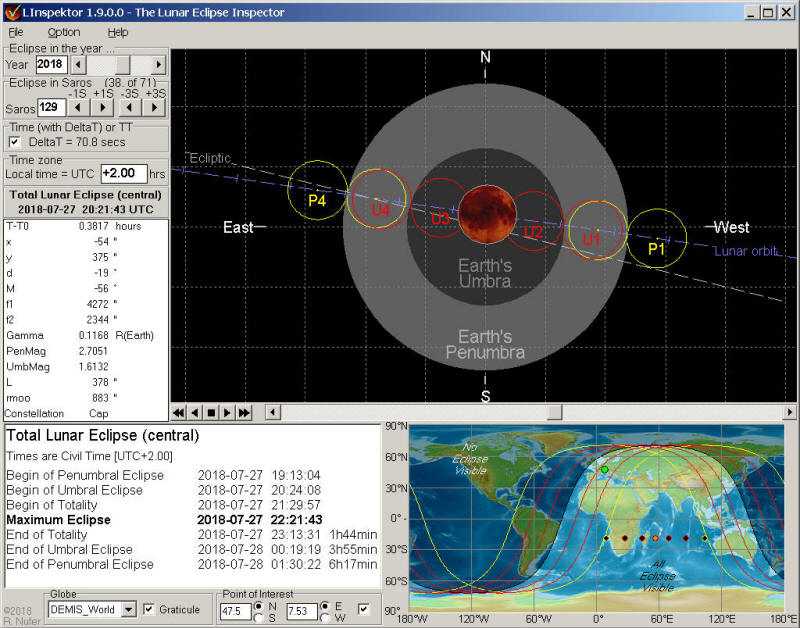
An overview over twelve millennia of lunar eclipses
Just for fun, or for control purposes, the key characteristics of all lunar eclipses between the years -4999 to +7000 can be checked using my free software LInspektor, which is available from my web site.
LInspektor Screen dump for the total lunar eclipse of July 27/28, 2018. The map in the lower right corner shows the zones of visibility. The green dot indicates the geographical location of Hurghada/ Egypt. This will be my observing site for the eclipse. |
|
LET'n'C: What equipment is needed (or suggested)?
|
|
Introduction
Eclipse enthusiasts love eclipses, not learning scripting languages. Therefore, the main goal of the program design of LET'n'C is user-friendliness. LET'n'C knows the required information of all partial and total lunar eclipses of the 21. century. The eclipse of interest, the time zone, and all camera settings can be selected or changed with the computer mouse or mouse pad. Once the Canon EOS camera is connected and powered, eclipse photography is ready after a few mouse clicks. Compared to solar eclipse photography, especially during the spectacular begin and end of totality, and the short duration of the totality, lunar eclipse photography is not really time critical. Basically, lunar eclipse photographers want to take pictures at a given time interval. LET'n'C users can chose from a set of time intervals (every 1, 2, 3, 4, 5, 6, 8, 9, or 10 minutes). For each time point, LET'n'C calculates the brightness value Q (see above) from the eclipse phase. LET'n'C proposes 'optimal' ISO and exposure time settings, and creates a line in the exposure table. The exposure table can then be fine tuned by the user. |
|
LET'n'C User instructions
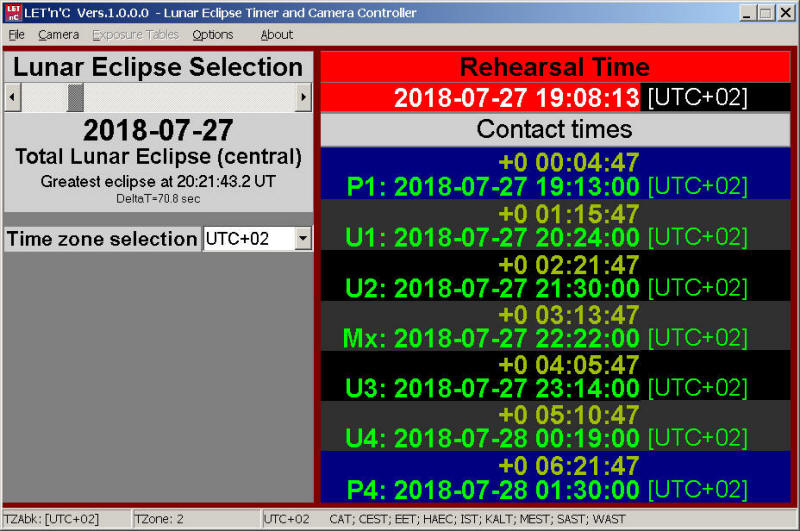
Main Menu
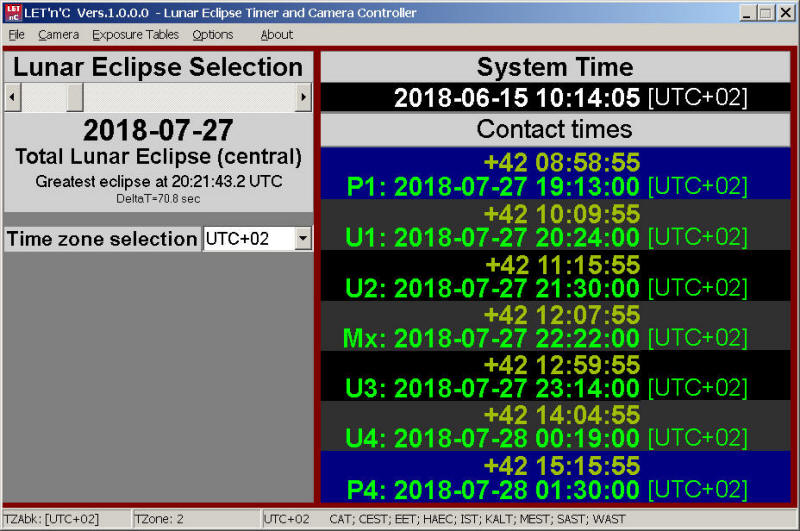
LET'n'C has three program forms. If the program is started, many settings from the last session are loaded, and the main form is shown. It looks like the following picture. At the top of the program form one finds a menu bar: File and Exit terminates the application. This is the same as closing the application by pressing Alt-F4. Camera opens the camera control and eclipse photography form. Exposure Tables opens the form for creating and fine tuning exposure tables. In Options , users can modify some preferences. About shows some program version information.
The right part of the main form shows the system time of the user's PC, and the time points of the different eclipse phases. In addition, the remaining time (countdown) from the actual PC time to the respective eclipse phase is shown. P1: Begin of penumbral lunar eclipse U1: Begin of partial lunar eclipse U2: Begin of totality. This field is empty for partial lunar eclipses. Mx: Maximum eclipse. U3: End of totality. This field is empty for partial lunar eclipses. U4: End of partial lunar eclipse P4: End of penumbral lunar eclipse
If option Tenths of seconds is ticked, all times are shown with 0.1 seconds precision. (This can be very tiring for your eyes) If option Eclipse times rounded to 30 sec. is ticked, all eclipse times are rounded to 30 seconds. IMHO, this precision is enough for lunar eclipse photography.
Camera control
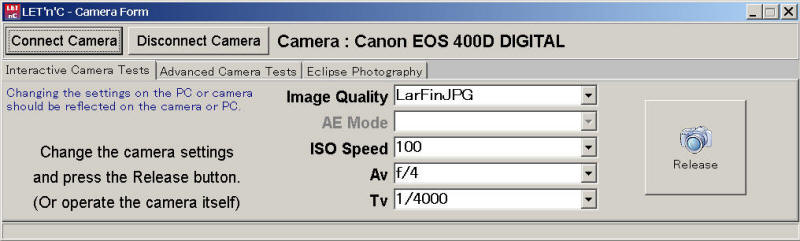
On the Main form there is a menu item Camera . This brings you to the Camera Form. Any camera activities (tests, eclipse photography) are triggered from this form. Beside the Connect and Disconnect buttons, the Camera form contains three tabbed pages:
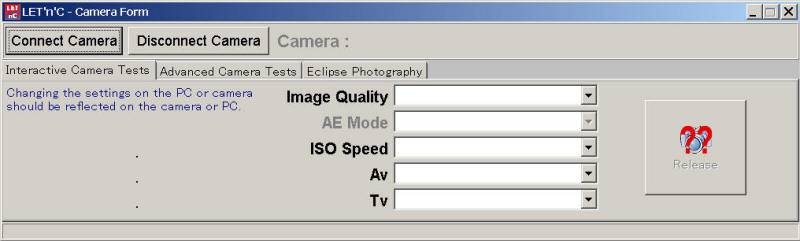
By default, the Interactive Camera Control page is shown.
If the camera is powered and connected to the PC, the button Connect Camera enables connection. The possible settings are read from the camera and filled in the combo boxes. After successful connection the form looks like this example ...
Note: The Camera must be and REMAIN in AE mode M ! The grayed and inactive AE mode field should remind you NOT to change the AE mode. You can now take your first "remote" picture by pressing the release button. Changing any settings on the form are reflected on the camera screen. Changing any settings on the camera are reflected on the camera form. Note: The pictures are saved in the memory card of the camera. LET'n'C does not transfer any pictures to the computer.
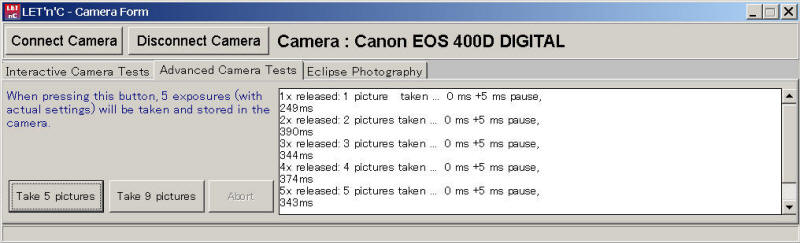
The next page on the Camera Form is called Advanced Camera Tests . This page is not for you. I use this page for test purposes.
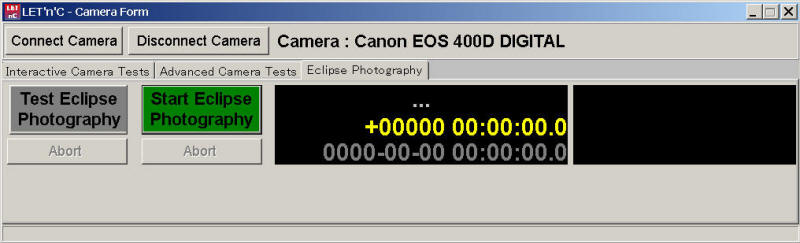
The third (and most important) page on the Camera Form is called Eclipse Photography . Before you press the Test Eclipse Photography button or the Start Eclipse Photography button, an Exposure Table must be created. If you have not already done, go to the Main Form, select Exposure Tables and press the Create Exposure Table button.
Keep the Exposure Table open somewhere on the desktop.
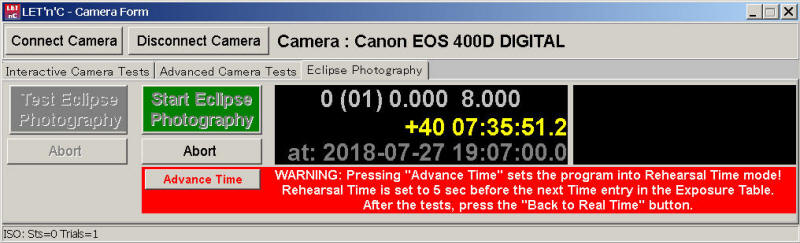
The following picture shows this Real Time behavior. The button Start Eclipse Photography was pressed on June 17, 20,8, about 40 days and 7 hours before the beginning of the total lunar eclipse on July 27, 2018.
During the real lunar eclipse you leave the computer untouched !!!
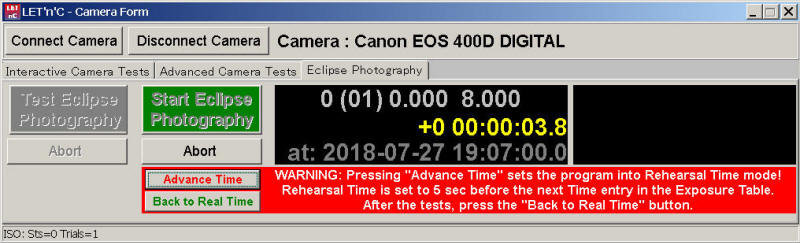
But for test purposes, a "Rehearsal Time"
can be advanced to the next Line in the Exposure Table.
If the button Advance Time is
pressed exactly once, you can test the complete eclipse
sequence of actions without waiting for the real
eclipse to begin. The following pictures show what happens, when the Advance Time button is pressed:
You can press the Back to Real Time button at any time of the tests.
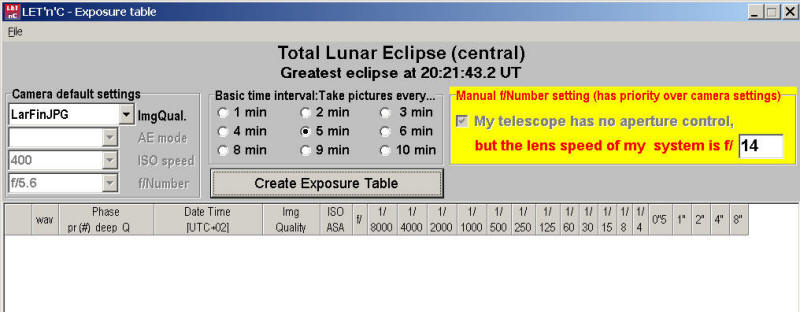
Exposure tables
Clicking the menu option Exposure Tables brings you to the exposure table form:
Verify, that the desired lunar eclipse is shown, and that the correct time zone is shown in the third header line (Date Time [UTC+02] in the above example).
This fills in the proposed exposure table, and the result may look like in this example:
The steps and decisions to fill-in the exposure table taken by LET'n'C are as follows: The time range and the time interval are computed based on
To find the time point of the first image, LET'n'C starts at the time of maximum eclipse. From there, the time is decremented in regular steps defined by the basic time interval, until one or two steps before P1 (begin of penumbral phase). The time point of the last image is computed accordingly until one or two steps after P4 (end of penumbral phase). For each step in between, the phase of the eclipse and the brightness value Q are computed. Based on Q and the user defined aperture value f/Number (14 in this example), a combination of ISO and exposure time is computed. This is done in a grid search with 70 meshes, assuming ISO values of 100, 200, 400, 800, 1600, and exposure times of 1/2000, 1/1000, 1/500, 1/250, 1/125, 1/60, 1/30, 1/15, 1/8, 1/4, 0"5, 1", 2", and 4" are available. The combination of ISO and exposure time that comes nearest to the computed exposure time according to Espenak's formula is then chosen.
For Q=8 and f/Number=f/14 Espenak's formula gives the following exposure times for the five ISO values:
The reciprocal difference of the combination ISO=1600 and exposure time=1/2000 is the smallest one (0.011). Therefore this combination is chosen for the first line in the above exposure table. Of course, the other combinations are roughly equivalent, and users may prefer other combinations.
This "side effect" is an advantage for users without special lunar guiding equipment. Even with a motorized equatorial mount that follows the stars, the Moon will appear blurry with longer exposure times due its relative movement over the sky. Moreover, IMHO "It is better to have a grainy image than a blurry image."
Now we can have a look at the entries in the exposure table.
Column wav shall be ignored and must remain empty.
Column Phase describes the situation with four numbers: Pr , (#) , deep , and Q . Pr is a code for the "progress" of the eclipse: 0 = no eclipse. Full Moon. The eclipse has not yet begun or is already over. -1 = penumbral eclipse before maximum eclipse -2 = partial eclipse before maximum eclipse -3 = total eclipse before maximum eclipse (only for total lunar eclipses) 4 = maximum eclipse 3 = total eclipse after maximum eclipse (only for total lunar eclipses) 2 = partial eclipse after maximum eclipse 1 = penumbral eclipse after maximum eclipse (#) is the sequential numbering within the "progress" of the eclipse: deep (short for deepness) is the relative progress (in time) since the begin of the current eclipse phase to the begin of the next eclipse phase. Before and after the lunar eclipse, where Pr is 0, deep is zero, too. Q is the brightness value.
Column Date Time lists date and time for shooting the image. Verify, that the correct time zone is shown. If more than one exposure time is checked, this is the time point of the shortest exposure time. Further images will be shot "as soon as possible".
Column Img Quality shows the image quality to be chosen. By default, this is the best JPG mode LarFinJPG, which is available for all Canon EOS cameras. If a Canon EOS camera is connected, users can change to another image quality from within the exposure table form.
Column ISO shows the chosen ISO value.
Column f/ is empty by default.
Columns 1/8000 to 8" contain the letter 'x' for the chosen exposure time. By default, only one of the columns contains an 'x'.
Exposure tables can be saved and loaded back using the File menu option.
Fine tuning of the exposure table
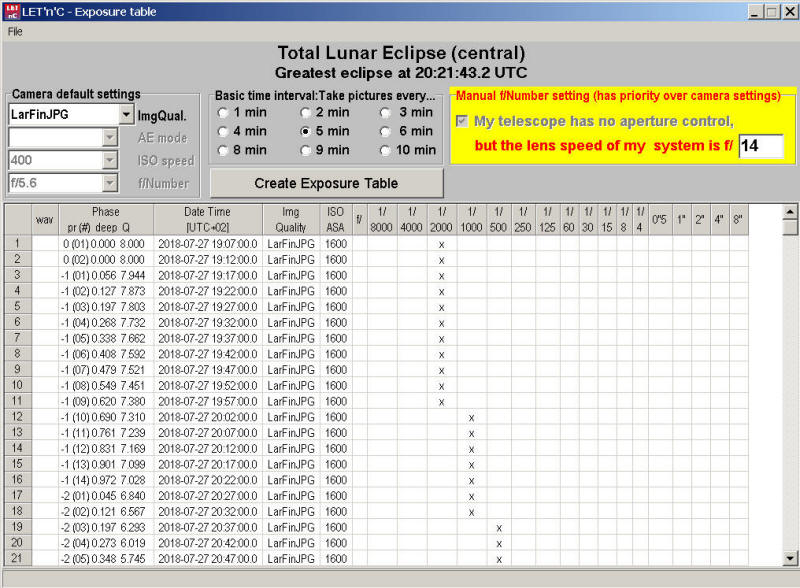
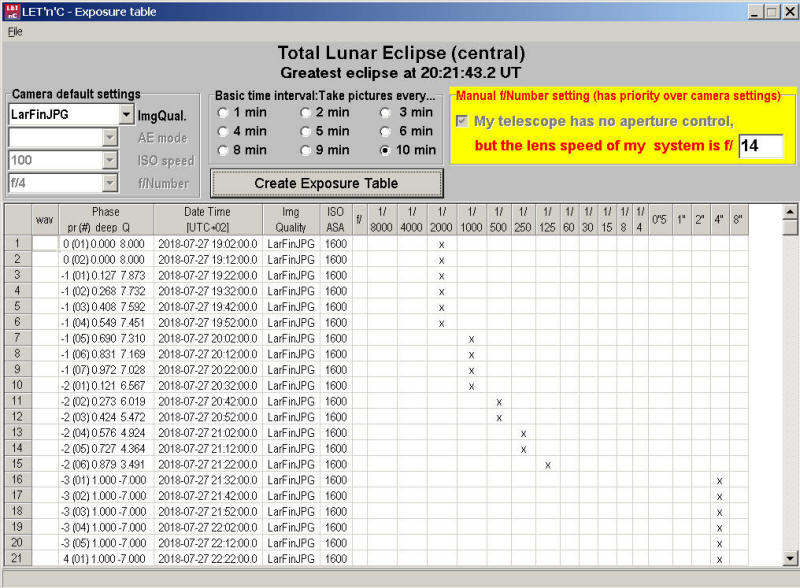
The cells in the exposure table must be either empty, or they can be changed to suit the users mood. This is best explained with an example. The following exposure table for the total lunar eclipse of July 27, 2018 is computed for a time interval of 10 minutes. This makes eclipse maximum fitting in one screen dump:
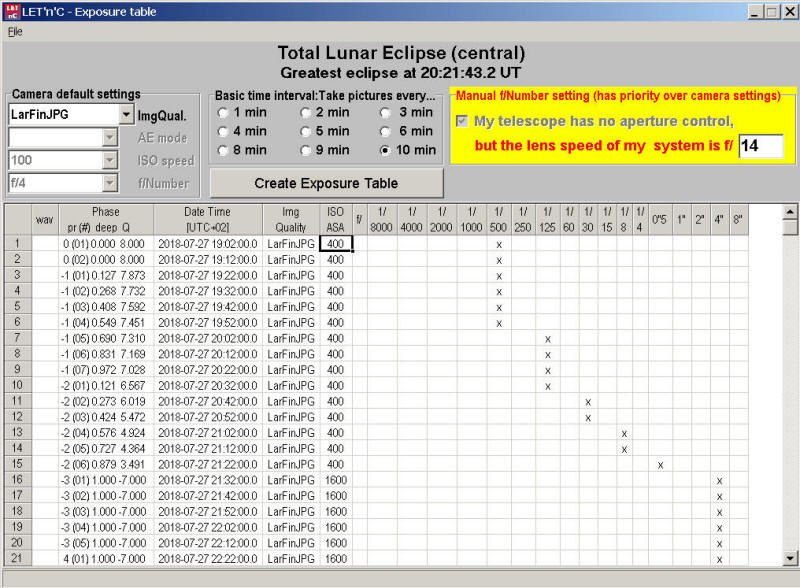
If you prefer a lower ISO setting at the cost of longer exposure times, you can change the ISO settings from 1600 to 400. This reduction in sensitivity has to be compensated by longer exposure times. Quartering the sensitivity means quadrupling the exposure time. Probably you want to do the same after totality, too. The exposure table looks now like this:
At each time point, more than one image can be shot. All exposure times with an 'x' are shot (as fast as possible) beginning at the time point in the column Date Time . If you want to have an an additional image with identical settings as the first row, set the 'x' accordingly. In this example, the exposure table will look like the following picture. Note the shorter exposure time during totality, because we have not changed the ISO sensitivity during totality phase.
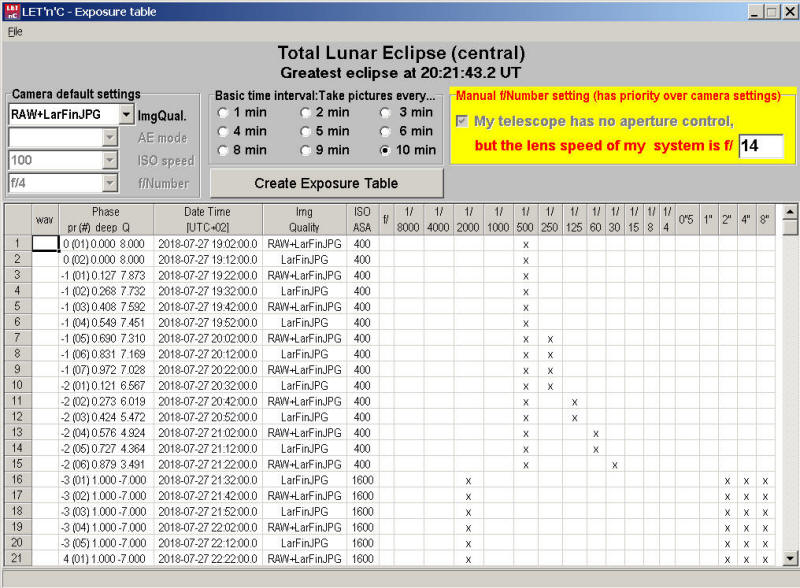
If you prefer to shoot RAW images for every second time point, you have to find out the exact ImgQual. description. For this, you have to enable connection to the Canon EOS camera. For my Canon EOS 400D the code is RAW+LarFinJPG. Because the Moon's brightness during totality is not known in advance, you may want to 'x' a shorter and a longer exposure time. Replacing each second Img Quality cell, and 'x'-ing all 2" and 8" cells during totality, will result in this exposure table:
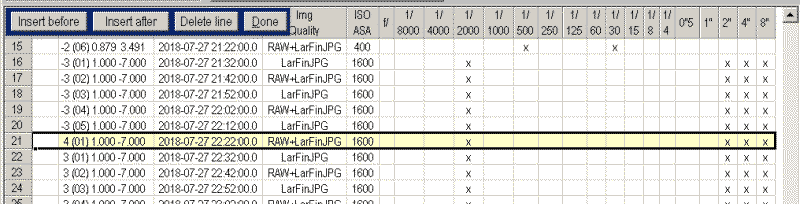
Manipulating cells in the exposure table is similar to editing cells in Windows Excel. You can even delete and insert lines. To do so, you have to right-click on the line number at the left edge of the exposure table. A small buttons field will appear. Lets assume, we want take additional images at the time of maximum eclipse, which is line 21 in this example. Right-clicking on the number field 21 will the exposure table make looking this way:
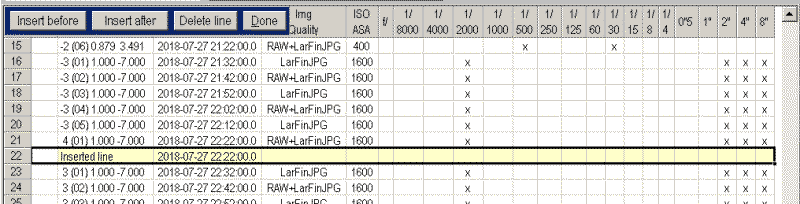
Pressing the button Insert after will make the exposure table look like the following picture. The column Phase lists "Inserted line". Indeed, this column is only free text. (Commas are not allowed!!!) Date and time are copied to the inserted line. The time point is identical to the previous line. This means, that the commands are executed "as fast as possible", but not before the time point. Date and time can be modified by the user, but the format must be exactly the same (seconds with one decimal digit). The remaining cells are empty for the moment.
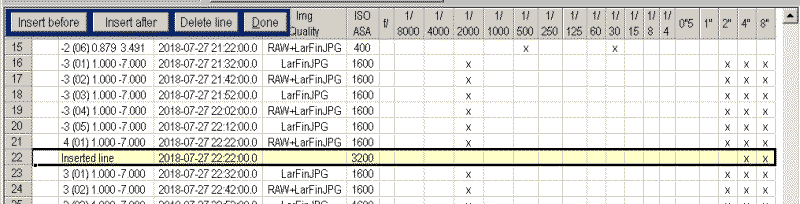
As an example we want to shoot two additional images with ISO 3200 sensitivity and exposure times of 4" and 8" . Enter 3200 in the ISO cell and put an 'x' into the 4" and 8" columns. We have not made an entry in the Img Quality cell, therefore no command is sent to the camera, which remains in the Img Quality mode RAW+LarFinJPG from the above line.
Close the small buttons field by clicking Done . Save the exposure table. During eclipse photography, the exposure table must be opened and visible somewhere on the screen.
|
|
Checklist for the lunar eclipse photography using LET'n'C
|
||
|
|
... | |
|
|
Power connection (AC adapter) for the computer. Note: Eclipse duration is often more than 6 hours. | |
|
|
Power connection for the parallactic mount, if available, (guiding system) | |
|
|
Power connection (AC adapter) for the Canon EOS camera. | |
|
|
Tripod and camera are set-up at a location, where the Moon is visible for the next 6-7 hours. | |
|
|
Memory card is inserted and formatted. | |
|
|
Canon EOS camera mode is set to manual M. | |
|
|
Canon EOS date and time are set to the same time zone as chosen in the LET'n'C main form. | |
|
|
Computer date and time are set to the same time zone as chosen in the LET'n'C main form. | |
|
|
Autofocus is disabled after focusing (suggested). | |
|
|
If available, aperture value f/Number is set to the same value as entered in the Exposure Tables form. | |
|
|
Software LET'n'C is installed. | |
|
|
... | |
|
Camera: Any of the tested models in the following table. Other Canon camera models should work, but are not yet tested. It is not necessary to have any delivered camera software installed on the PC. The camera should be equipped with a large and fast memory card, as the images are stored in the camera. I'm using CompactFlash® Extreme III® and Extreme Pro® with 8 and 32 GB capacity.
Tested Canon camera models: |
|
|
Canon EOS 350D (not compatible) Canon EOS
400D |
All Canon EOS models released after ~2005 should work. |
|
Program history of LET'n'C (improvements and bug fixes) |
|||
|
Date |
Program Version |
Windows version |
New in this version |
|
20250310 |
4.21.1.0 | Win 7/8/10/11 | Brasil time zone added (UTC-03). |
|
20240617 |
4.20.1.0 | Win 7/8/10/11 | EDSDK.dll 13.18.0 installed. (Windows 7/8/10). |
|
20221116 |
4.15.1.0 | Win 7/8/10/11 |
EDSDK.dll
13.15.20 installed.
(Windows 7/8/10). Camera support for Canon EOS R and R7. Minor corrections |
|
20220804 |
4.13.1.0 | Win 7/8/10/11 | Minor corrections |
|
20220804 |
4.13.0.0 | Win XP | Minor corrections |
|
20210817 |
4.12.1.0 | Win 7/8/10/11 |
EDSDK.dll
13.13.20 installed.
(Windows 7/8/10) Camera support for Canon EOS R6. |
|
20210817 |
4.12.0.0 | Win XP |
EDSDK.dll 3.4 installed.
(Windows XP) Camera support for Canon EOS R6. |


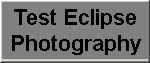 When
this button is pressed, the pictures are taken according to the
Exposure Table, but the date and time are ignored. With this test
you can quickly check, weather your memory card has enough storage
capacity. If you didn't already create an exposure table, a message
is shown in the right text box..
When
this button is pressed, the pictures are taken according to the
Exposure Table, but the date and time are ignored. With this test
you can quickly check, weather your memory card has enough storage
capacity. If you didn't already create an exposure table, a message
is shown in the right text box..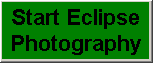 When
this button is pressed, the eclipse photography starts. You can
press this button at any time. In the middle text box the
description of the next action will be written, the time difference
to the action (yellow) and the date and time of the action (gray).
When
this button is pressed, the eclipse photography starts. You can
press this button at any time. In the middle text box the
description of the next action will be written, the time difference
to the action (yellow) and the date and time of the action (gray).